
Hey Raúl,
You have taken advantage of the 2019 Christmas break to build some stuff that will make your classes at IE School of Human Science and Technology easier to follow (hopefully); this deserves another blog entry to remember everything you did just in case you have to make some changes in the future 🙂 It’s going to be a longer than usual entry, so there will be some headings to facilitate the reading and, if someone else wants to give it a try, be patience as if you want to reproduce the whole stuff it will take you (potentially) some hours… but you can get an export of the OVA* and save some time if you’re only interested in playing around with the outcome :p
Motivation and expectations
As many other people out there I truly believe in the “practice makes perfect” motto, which I try to apply on a daily basis even when I’m teaching technology. In the Big Data space, there are technologies such as Splunk where you have everything (storage, analytics and visualization capabilities) in one single bundle and, by using a trial version, you’re ready to start your learning journey with your personal computer. However, in my humble experience and opinion, other technologies are not shipped that well and even though vendors (or other third party entities) provide on demand environments ready to be used in private or public clouds, they lack of good options for people who want to use their computers (on-premise) to learn such technologies.
For my Spark classes, I have now a new virtual environment based on VirtualBox where my students can play around with the framework and the many libraries shipped with it, as well as they can access other storage options such as MongoDB and a relational database such as SQLite to see data federation in action. The following bullet points summarize the contents of the virtual environment that I’ve built and I’ll show how to build it:
- Debian 10 (Buster) as the Operating System for the virtual environment.
- Java 8 SDK from the AdoptOpenJDK project (dependency for Spark 2.x as of now).
- Python 3.7 (dependency for Spark 2.X as of now).
- Apache Spark 2.4.4
- Jupyter Lab 1.0 from the pip repository.
- RTTY and RTTYS for an easy access to the virtual environment via our web browser of choice.
- MongoDB 4.2.2 stand-alone instance with the WDTCS dataset built by my great friend Rubén Terceño.
- SQLite 3.27 and a small data set containing Hillary Clinton’s Emails from Kaggle.
- Trucking Data Simulator borrowed from George Vetticaden’s Github repository.
Building process
Even though I’m going to ship the virtual environment with multiple artifacts and you might think this is complex, you’ll realize that it’s actually a very straightforward process although time consuming so that will be split in three blocks.
Keep in mind that I’ve done everything from an educational perspective and in order to have a clear understanding of every single step that has to be taken. In real life, this kind of processes are automated and parameterized by using tools and frameworks such as Ansible, Vagrant, … which I’ve used successfully many times in the past. This is not the goal of this entry, and hence that hasn’t been considered.
Building the virtual environment
We have to create and setup the virtual machine before we can start the installation of the operating system:
- Download and install VirtualBox from the official website. I’ve used VirtualBox 6.1, an older version should work as well:

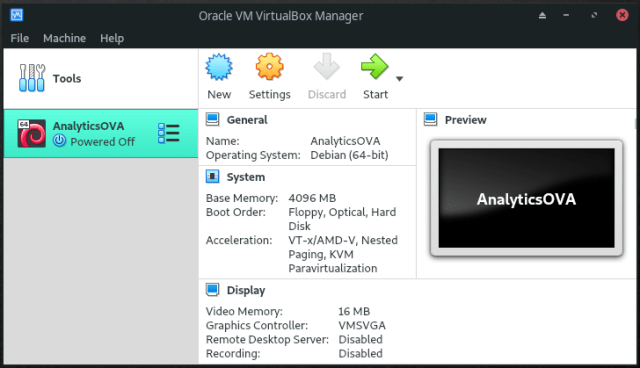
- Create a new virtual machine called AnalyticsOVA inside the default Machine Folder of type Linux and version Debian (64-bit):

- If you have a +8GB RAM computer set your virtual machine memory size to 4GB (4096MB). Even though 2GB memory size for the virtual machine should work, it’s preferred that you stick to the 4GB recommendation, therefore your computer’s memory should be greater than 4GB:

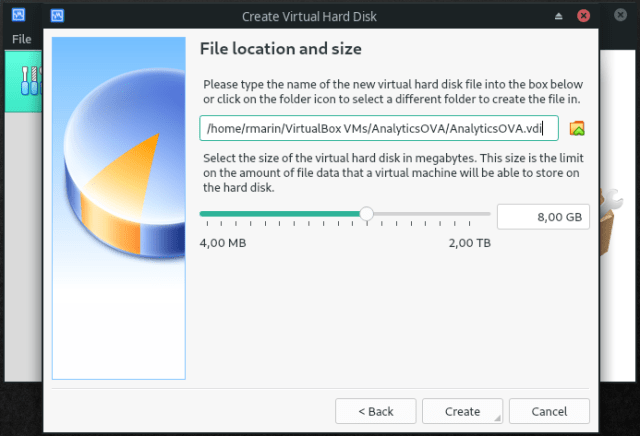
- Let’s create a 8GB size VDI format virtual disk dynamically allocated. It might seem a small disk but it’ll be enough for us as we won’t deal with large data sets; remember, this is an OVA to learn and no for doing analysis nor processing at scale. After the virtual disk creation, the virtual machine is ready to be used:


- Last but not least, we need to customize the network setup to allow the access to the following services: SSH (22 which will be mapped to local TCP port 2222), SparkUI (4040), RTTY (8080) and Jupyter (8888).
Open the Settings window by clicking the Settings icon, then go to the Network section and, within the Adapter 1 tab, click the Port Forwarding button. Add a rule for each of the services above in the Port Forwarding Rules window showing up:


We’re now ready to install our fancy operating system in which the rest of the software will rely on:
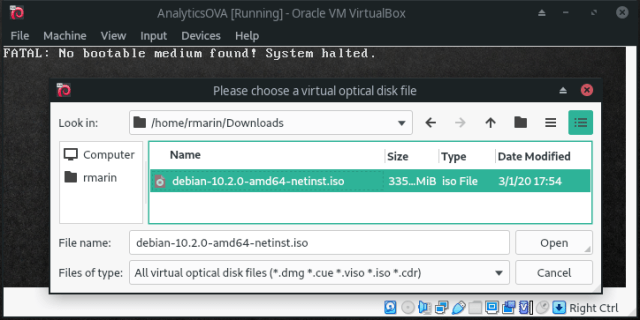
- Download a 64-bit small installation image of Debian 10:

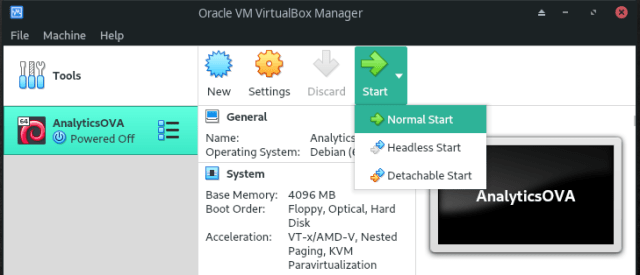
- Run a Normal Start of the recently created virtual machine, select the already downloaded Debian image and the installation process will start:


- The video I share at the end of the blog post shows all the nuances of the installation process but, long story short, I do a default English installation, Spain as location, locale settings to United States and Spanish key map. I don’t customize the partition schema of the virtual disk and will go with the “Guided – use entire disk” and “All files in one partition” options. My non-root account will be called bigdata and will be used to setup the analytics environment. I don’t do any additional software selection (I’m not interested in any desktop environment).


- Let’s log in as root user, install some tools (sudo among others) and configure sudoers to let the bigdata account move on with the installation process:
# apt-get -y install sudo unzip net-tools tmux wget python3-pip curl
The installation process will take a while because of the dependencies (ex. python3-pip depends upon Python3, so it’ll include and install it). Edit the file /etc/sudoers by typing visudo and add an entry for the bigdata user:
…
# User privilege specification
root    ALL=(ALL:ALL) ALL
bigdata ALL=(ALL:ALL) ALL
…
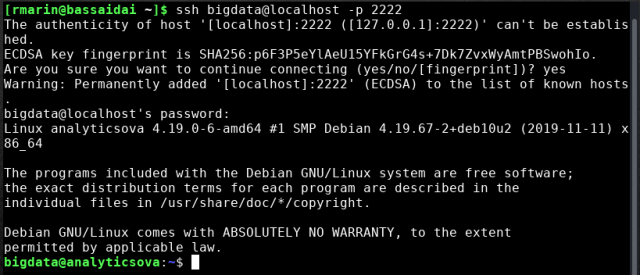
- From this point on, I’ll connect to the virtual machine via SSH to be able to copy and paste text easily so, let’s close the current session as root and log in as bigdata user via SSH (remember the 2222 TCP port to 22 TCP port mapping):
$ ssh bigdata@localhost -p 2222
- Once in again, it’s time to download, install and setup RTTY server:
$ wget https://github.com/zhaojh329/rttys/files/3495203/rttys-linux-amd64.tar.gz
$ cd /opt
$ sudo tar zxvf ~/rttys-linux-amd64.tar.gz
$ sudo chown -R bigdata.bigdata /opt/rttys-linux-amd64
$ rm ~/rttys-linux-amd64.tar.gz
Edit the file /opt/rttys-linux-amd64/rttys.conf and add the following configuration:
addr: :8080

# default from system
#username: rttys
#password: rttys
- We need to install the RTTY client to let us log into the virtual machine through our web browser of choice:
$ cd
$ wget -qO- https://raw.githubusercontent.com/zhaojh329/rtty/master/tools/install.sh | sudo bash
- Guided by the Systemd services wiki entry, I’ll create a couple of files to create RTTY server and client systemd services to start them up automatically at boot time. File for RTTY server will be /etc/systemd/system/rttys.service:
# Contents of /etc/systemd/system/rttys.service
[Unit]
Description=RTTY server
After=network.target

[Service]
Type=simple
Restart=always
WorkingDirectory=/opt/rttys-linux-amd64
ExecStart=/opt/rttys-linux-amd64/rttys

[Install]
WantedBy=multi-user.target
File for RTTY client will be /etc/systemd/system/rtty.service:
# Contents of /etc/systemd/system/rtty.service
[Unit]
Description=RTTY client
After=network.target

[Service]
Type=simple
Restart=always
User=root
ExecStart=/usr/local/bin/rtty -I 'sparkcourseova' -h 'localhost' -p 8080 -a -v -s -d 'Spark Course OVA'

[Install]
WantedBy=multi-user.target
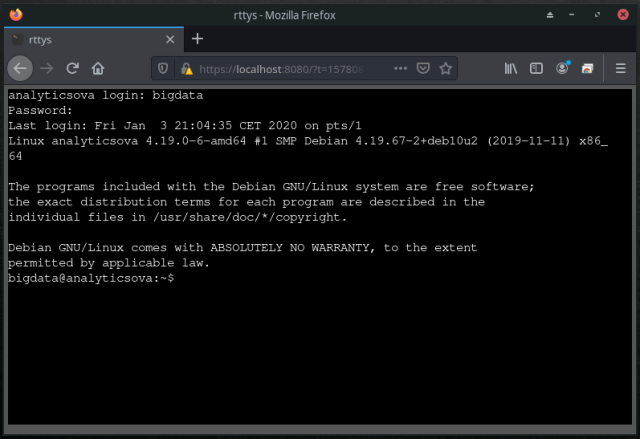
- We’re almost there! Now I’ll enable, start and check that both services are running and will point my web browser to https://localhost:8080 to log into the virtual machine and follow the outstanding steps:
$ sudo systemctl daemon-reload
$ sudo systemctl enable rttys.service
$ sudo systemctl enable rtty.service
$ sudo systemctl start rttys.service
$ sudo systemctl status rttys.service
$ sudo systemctl start rtty.service
$ sudo systemctl status rtty.service


- We’ll finish this block by installing Java 8 SDK from AdoptOpenJDK by following the installation guide for Linux systems:
$ wget -qO - https://adoptopenjdk.jfrog.io/adoptopenjdk/api/gpg/key/public | sudo apt-key add -
$ sudo apt-get install -y software-properties-common
$ sudo add-apt-repository --yes https://adoptopenjdk.jfrog.io/adoptopenjdk/deb/
$ sudo apt-get update
$ sudo apt-get install adoptopenjdk-8-hotspot
Building the analytics environment
Having our brand new Debian installation properly configured, it’s time to install and configure our analytics environment:
- I’m going to install Jupyter Notebook and a helper called findspark from the pip repository:
$ sudo pip3 install jupyter findspark
Even though it’s installed, it’s not accessible from outside the virtual environment by default so we need to create a configuration file:
$ cd
$ jupyter notebook --generate-config
which will create the file /home/bigdata/.jupyter/jupyter_notebook_config.py where we can tell Jupyter Notebook to listen to external requests by adding the following line:
…
## The IP address the notebook server will listen on.
#c.NotebookApp.ip = 'localhost'
c.NotebookApp.ip = '*'
…
Finally, I’ll create an easy to remember password (bigdata123) to access Jupyter Notebook without having to provide the boot up token (the default security mechanism) every time we restart our analytics environment:
$ jupyter notebook password
- Time to install and configure Spark, the core of our analytics environment. Firstly, I’ll download Apache 2.4.4 from the rediris mirror, although for future releases I might be interested in looking into the downloads section from the Apache Spark website for newer releases:
$ cd
$ wget apache.rediris.es/spark/spark-2.4.4/spark-2.4.4-bin-hadoop2.7.tgz
$ cd /opt
$ sudo tar zxf ~/spark-2.4.4-bin-hadoop2.7.tgz
$ sudo chown -R bigdata:bigdata spark-2.4.4-bin-hadoop2.7
$ rm ~/spark-2.4.4-bin-hadoop2.7.tgz
I’ll append the following lines to the ~/.profile file to make Spark available to the bigdata user:
…
# set environment variables for Spark and rtty (Spark course)
SPARK_HOME=/opt/spark-2.4.4-bin-hadoop2.7/
HADOOP_HOME=/opt/spark-2.4.4-bin-hadoop2.7/
TERM=xterm
PATH=$PATH:$SPARK_HOME/bin
export TERM
Then, I’ll create the spark-env.sh file under $SPARK_HOME/conf using the corresponding template inside the same folder (spark-env.sh.template):
$ cd
$ . .profile
$ cd $SPARK_HOME/conf
$ cp spark-env.sh.template spark-env.sh
Lastly, let’s tell Spark to use Python3 by appending the PYSPARK_PYTHON variable environment with the proper value at the end of the $SPARK_HOME/conf/spark-env.sh file previously created:
...
# PySpark specific settings
PYSPARK_PYTHON=python3
- We’ll create a folder called labs to hold notebooks and other artifacts, and another called data to store data sets for the data sources that we’ll install later on:
$ mkdir ~bigdata/labs
$ mkdir ~bigdata/data
- In order to start Jupyter Notebook automatically every time the virtual environment starts up, we have to create a systemd service as we did before. This systemd service will be added into the file /etc/systemd/system/jupyter.service:
# Contents of /etc/systemd/system/jupyter.service
[Unit]
Description=Jupyter Notebook
After=network.target
[Service]
Type=simple
Restart=always
User=bigdata
Environment="SPARK_HOME=/opt/spark-2.4.4-bin-hadoop2.7"
WorkingDirectory=/home/bigdata/labs
ExecStart=jupyter notebook
[Install]
WantedBy=multi-user.target
Once created, we need to tell systemd to consider, enable and start it; check the status at the end to be sure that all went good:
$ sudo systemctl daemon-reload
$ sudo systemctl enable jupyter.service
$ sudo systemctl start jupyter.service
$ sudo systemctl status jupyter.service
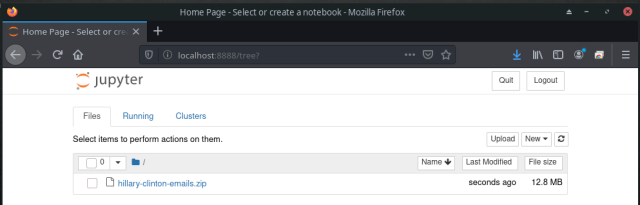
Point the browser to http://localhost:8888, provide the easy to remember password (bigdata123) and, et voilà, Jupyter Notebook is up and running ready to start wrangling data with Spark:


Adding data sources and testing them out
Now it’s time to add some data sources to the OVA to connect Spark to data sources other than local files. This might change in the future once I have some other data sets which enable to have a proper data federation example with Spark:
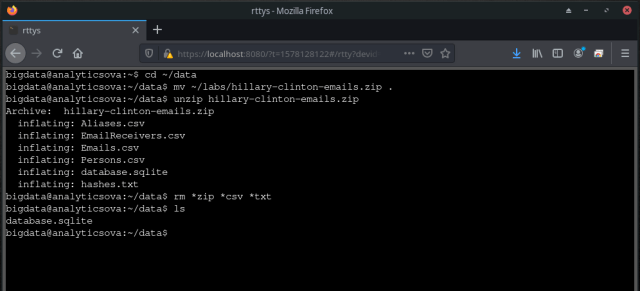
- Let’s start with SQLite and the Hillary Clinton’s emails data set available at Kaggle.com (sign-in required). Once downloaded to your local computer, upload it to the virtual environment by using Jupyter Notebook and then move it to the ~bigdata/data folder from the command line:

$ cd ~/data
$ mv ~/labs/hillary-clinton-emails.zip .
$ unzip hillary-clinton-emails.zip
$ rm *zip *csv *txt
Let’s test it out before moving forward with the following code snippet:import findspark findspark.init() import os os.environ['PYSPARK_SUBMIT_ARGS'] = '--packages org.xerial:sqlite-jdbc:3.16.1 pyspark-shell' from pyspark.context import SparkContext from pyspark.sql.session import SparkSession driver = "org.sqlite.JDBC" path = "/home/bigdata/data/database.sqlite" url = "jdbc:sqlite:" + path tablename = "Persons" sc = SparkContext.getOrCreate() spark = SparkSession(sc) dbDataFrame = \ spark.read.format("jdbc").option("url", url)\ .option("dbtable", tablename)\ .option("driver", driver).load() dbDataFrame.select("Name").distinct().show(5)
- Time to install the latest and greatest MongoDB Community Edition, the database for GIANT IDEAS (this brings me really good memories :)), by following the installation guide available in the superb official documentation:
$ wget -qO - https://www.mongodb.org/static/pgp/server-4.2.asc | sudo apt-key add -
$ echo "deb http://repo.mongodb.org/apt/debian buster/mongodb-org/4.2 main" | sudo tee /etc/apt/sources.list.d/mongodb-org-4.2.list
$ sudo apt-get update
$ sudo apt-get install -y mongodb-org
The installation process create a systemd MongoDB service which is not started automatically at boot time. This is good because it will avoid consuming unnecessary resources when we’re not accessing the MongoDB dataset. Should we need access to this data set, we can start the MongoDB systemd service as we did previously with other systemd services:
$ sudo systemctl start mongod.service
$ sudo systemctl status mongod.service
$ sudo systemctl stop mongod.service
It’s going to be a demo deployment and a stand-alone without any fancy configuration (ex. no security) nor optimization. Once installed, I’ll download a cool data set created by my good friend Rubén Terceño back in time when we used to deliver talks about how cool MongoDB is :p:
$ cd ~bigdata/data
$ curl https://raw.githubusercontent.com/raulmarinperez/wdtcs/master/data/dump%202.zip -o dump_2.zip
$ unzip dump_2.zip
$ mongorestore --db=analytics dump/WDTCS
$ rm -rf dump dump_2.zip
Let’s check that everything is ok by using the command line MongoDB client:
$ mongo
> use analytics
> db.ports.findOne()
{
   "_id" : ObjectId("56fda4e90a162d0f051f2ce7"),
   "Ranking" : 3,
   "Name" : "Shenzhen",
   "Country" : "China"
}
> exit
and by accessing from Jupyter Notebook:
import findspark
findspark.init()

import os
os.environ['PYSPARK_SUBMIT_ARGS'] = '--packages "org.mongodb.spark:mongo-spark-connector_2.11:2.4.1" pyspark-shell'

from pyspark.context import SparkContext
from pyspark.sql.session import SparkSession

sc = SparkContext.getOrCreate()
spark = SparkSession(sc)

df = spark.read.format("mongo").option("uri","mongodb://localhost/analytics.ships").load()
df.take(1)
- We’re almost at the end of the blog post, Woo hoo!!!; something that I didn’t want to miss in this OVA is an artifact to do some stream processing exercises and, at the time of writing, the best data generator that I have is the Trucking Data Simulator that I used back in time at Hortonworks and I’ve borrowed from George Vetticaden’s Github repository. The following steps will place all the binaries under the /opt/Data-Loader folder and will create a subfolder /opt/Data-Loader/truck-sensor-data where all the events will be appended as the simulator generates them:
$ cd
$ wget https://github.com/raulmarinperez/collaterals/raw/master/knowledge/data_generation/trucking_data_sim/Data-Loader.zip
$ cd /opt
$ sudo unzip ~/Data-Loader.zip
$ sudo chown -R bigdata:bigdata Data-Loader
$ cd Data-Loader
$ mkdir /opt/Data-Loader/truck-sensor-data
$ tar zxf routes.tar.gz
$ rm routes.tar.gz
$ rm ~/Data-Loader.zip
As with the MongoDB instance, the simulator won’t be running all the time but only when needed. I’ll create another systemd service but I won’t enable it to prevent its execution at boot time. The systemd service definition will be kept inside the file /etc/systemd/system/data-loader.service:
# Contents of /etc/systemd/system/data-loader.service
[Unit]
Description=Data Loader
After=network.target

[Service]
Type=simple
Restart=always
User=bigdata
Environment="DATA_LOADER_HOME=/opt/Data-Loader"
ExecStart=java -cp ${DATA_LOADER_HOME}/stream-simulator-jar-with-dependencies.jar hortonworks.hdp.refapp.trucking.simulator.SimulationRunnerApp 20000 hortonworks.hdp.refapp.trucking.simulator.impl.domain.transport.Truck hortonworks.hdp.refapp.trucking.simulator.impl.collectors.FileEventCollector 1 ${DATA_LOADER_HOME}/routes/midwest/ 10000 ${DATA_LOADER_HOME}/truck-sensor-data/all-streams.txt ALL_STREAMS
StandardOutput=file:/dev/null
StandardError=file:/dev/null

[Install]
WantedBy=multi-user.target
When we need to use the simulator the only thing we have to do is to start up the systemd service, check the status and once we’re done we have to stop it:
$ sudo systemctl start data-loader.service
$ sudo systemctl status data-loader.service
$ sudo systemctl stop data-loader.service
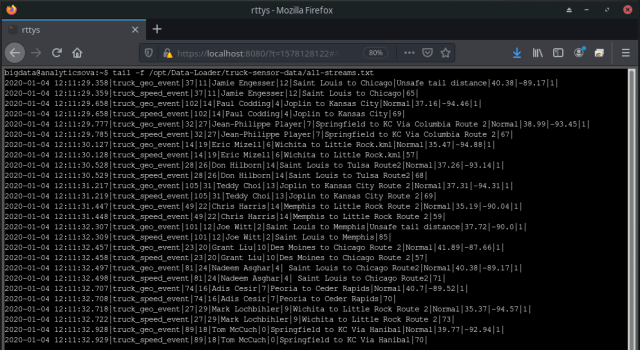
The simulator will be properly running if the systemd service says so and new events are continuously appended to the file /opt/Data-Loader/truck-sensor-data/all-streams.txt:
$ tail -f /opt/Data-Loader/truck-sensor-data/all-streams.txt
Conclusions
After this never ending blog post I hope to have a reliable environment to help my students understand the foundation on data analysis and processing we see in class without having to rely on third party environments nor connectivity to access those environments when they’re not at the school facilities. Of course, it has been a good exercise for me to collect in one single place the vast amount of notes I have here and there and have used to build this environment, which I would have forgotten very soon and it would have made difficult to evolve it when needed.
Last but not least, the traditional recording with everything in action:
Bye future self 🙂
Raúl
* The following are the credentials used to build the OVA:
- Operating System:
- root:Le7VaoII
- bigdata:bigdata123
- RTTY:
- bigdata:bigdata123
- Jupyter:
- bigdata123 (no username, only password)

Pingback: Big Data frameworks on an Apple M1/Silicon for educational purposes – Dear future self
Pingback: It’s 2023 and OSBDET 2023 Release 1 is out! – Dear future self
Pingback: It’s 2024 and OSBDET 2024 Release 1 is out! – Dear future self